
TL;DR
In this post we will extend AI DIAL with Addons using .NET Aspire. We will build a simple TODO Assistant that allows us to manage our TODO list using natural language.
Source code: https://github.com/NikiforovAll/ai-dial-dotnet
Table of Contents:
Introduction
In my previous blog post, I’ve introduced you to DIAL, an open-source AI orchestration platform.
AI DIAL promises to be an extensible platform for building and deploying AI applications. In this post, we will learn how to add Addons to AI DIAL. Addons are a powerful way to extend the functionality of your AI applications by integrating with external services or APIs.
The great thing about DIAL Addons is that they are based on OpenAI GPT Actions (aka Plugins). At their core, GPT Actions leverage Function Calling to execute API calls.
In this blog, we will build a todo-assistant based on the official TODO Assistant from OpenAI. This Addon will allow us to manage our TODO list using natural language commands.
In AI DIAL, conversational agents enable direct interactions between end-users and applications or language models via the AI DIAL Chat interface or AI DIAL API.
Build the Assistant from Scratch
Let’s create empty Aspire AppHost project:
dotnet new aspire-apphost -n AppHost -o AppHost
The default Program.cs looks like this:
var builder = DistributedApplication.CreateBuilder(args);

builder.Build().Run();
Add DIAL Core
📦 Let’s install Aspire Host integration - Nall.EPAM.Dial.Aspire.Hosting.
dotnet add package Nall.EPAM.Dial.Aspire.Hosting
Now we can add the DIAL hosting to our application. The Program.cs file should look like this:
var builder = DistributedApplication.CreateBuilder(args);

var dial = builder.AddDial("dial", port: 8080).WithChatUI(port: 3000); // <--Adds DIAL and Chat UI

builder.Build().Run();
🚀 Now, we can use Aspire cli to run our application:
aspire run --project AppHost/AppHost.csproj
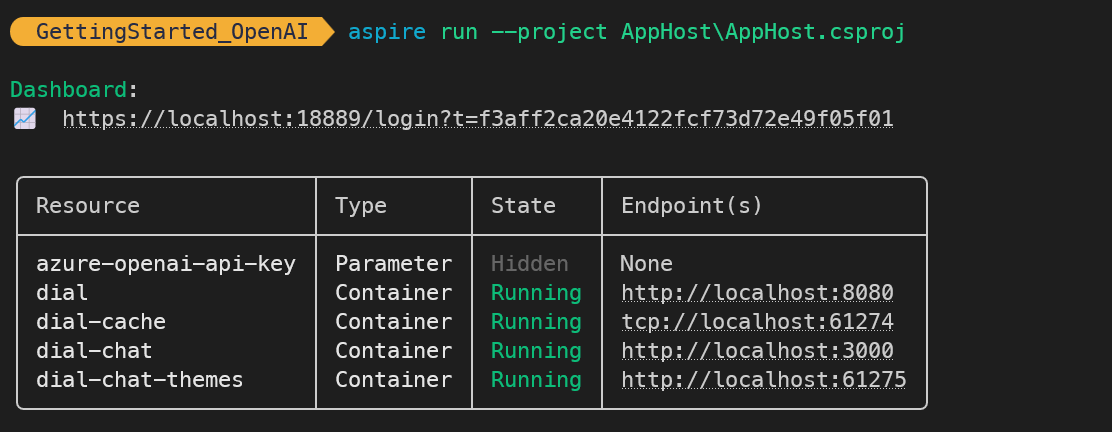
Here is the the Aspire Dashboard:
Add Assistant with Addon
Once we deployed the DIAL Core, we can add the Addon. The Addon is a simple HTTP API that will be called by the DIAL Core when it needs to execute an action.
🐋 Here is an example of Dockerfile of “TODO List” Addon:
FROM python:3.11-alpine AS builder

RUN apk update && apk add git
RUN git clone https://github.com/openai/plugins-quickstart.git

FROM python:3.11-alpine
COPY --from=builder /plugins-quickstart /plugins-quickstart

WORKDIR /plugins-quickstart
RUN pip install -r requirements.txt

EXPOSE 5003
CMD ["python", "main.py"]
We will run this addon as container using Aspire:
var builder = DistributedApplication.CreateBuilder(args);

var dial = builder.AddDial("dial", port: 8080).WithChatUI(port: 3000);

var todoAddonContainer = builder
    .AddDockerfile("todo-addon-container", contextPath: "addons", dockerfilePath: "TodoDockerfile")
    .WithHttpEndpoint(port: null, targetPort: 5003, "http");

builder.Build().Run();
Next, we wil register the Addon with the DIAL Core:
var builder = DistributedApplication.CreateBuilder(args);

var dial = builder.AddDial("dial", port: 8080).WithChatUI(port: 3000);

var todoAddonContainer = builder
    .AddDockerfile("todo-addon-container", contextPath: "addons", dockerfilePath: "TodoDockerfile")
    .WithHttpEndpoint(port: null, targetPort: 5003, "http");


var todoAddon = dial.AddAddon("todo-addon")
    .WithUpstream(todoAddonContainer)
    .WithDisplayName("TODO List")
    .WithDescription("Addon that allows to manage user's TODO list.");

dial.AddAssistantsBuilder()
    .AddAssistant("todo-assistant")
    .WithPrompt(
        "You are assistant that helps to manage TODO list for the user. You can add, remove and view your TODOs."
    )
    .WithDescription(
        "The assistant that manages your TODO list. It can add, remove and view your TODOs."
    )
    .WithDisplayName("TODO Assistant")
    .WithAddon(todoAddon);

builder.Build().Run();
🚀 Let’s run the AppHost and see the result:
aspire run --project AppHost/AppHost.csproj
Here is the ouput of the Aspire CLI:
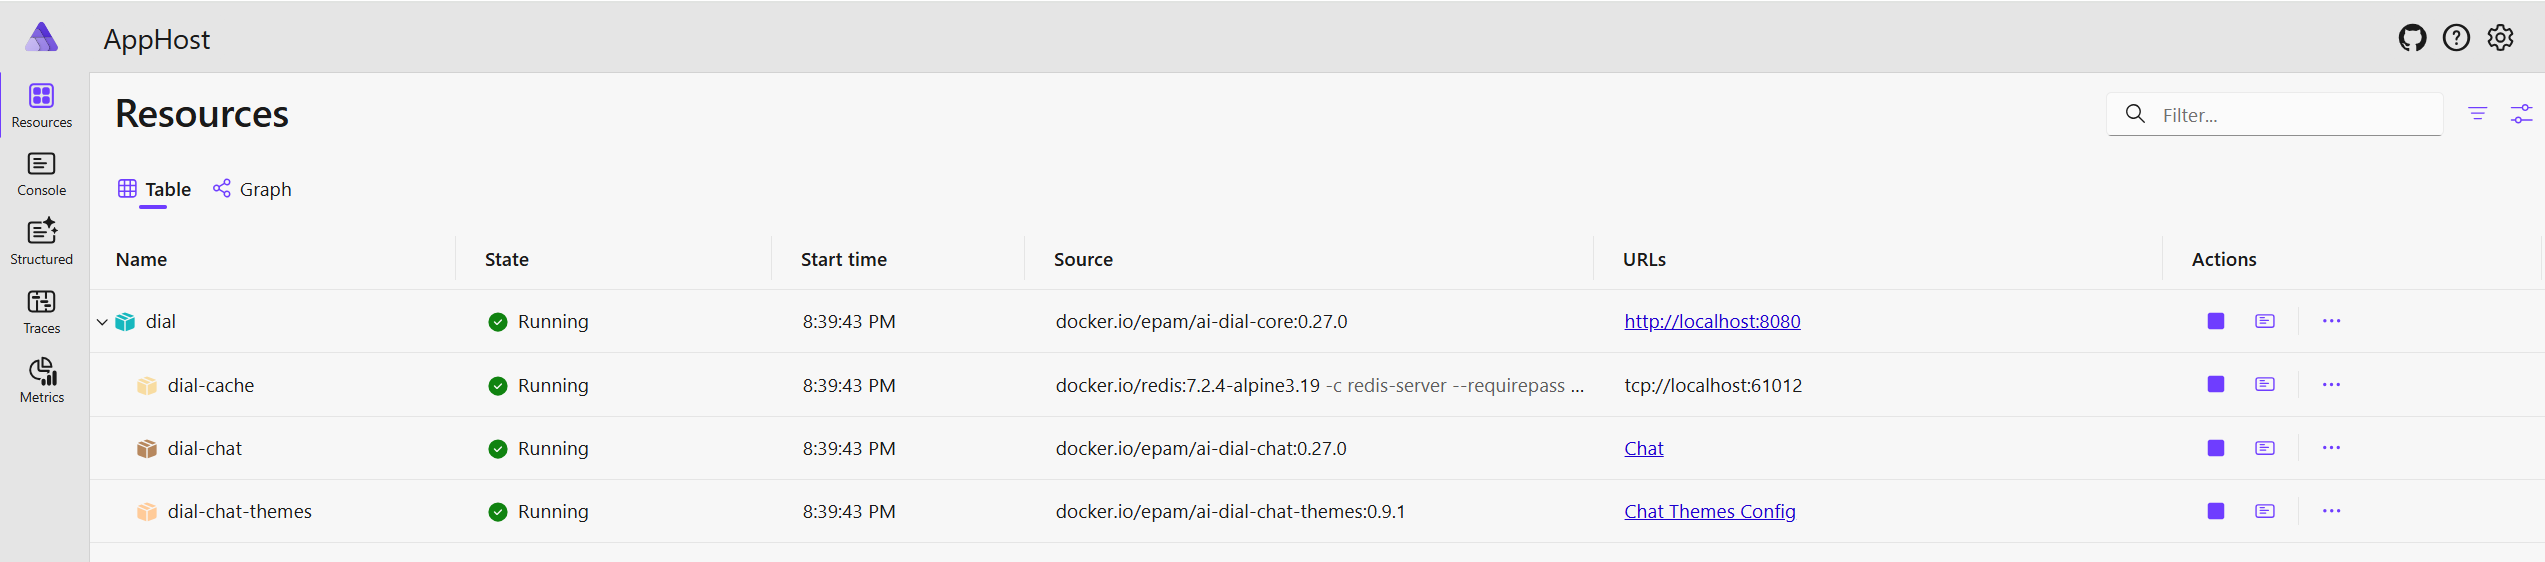
And here is the Aspire Dashboard:
If you open the Chat UI, you will see the TODO Assistant:

☝️ But before we can use it, we need to deploy OpenAI model that supports Function Calling.
When you open Chat UI, you will see the following message - “Not available agent selected. Please, change the agent to proceed “.
Let’s fix this one.
Deploy OpenAI Model - GPT-4o
📦 We will add Azure OpenAI hosting integration to the AppHost:
dotnet add package Aspire.Hosting.Azure.CognitiveServices
Let’s add model deployment to the AppHost:
var builder = DistributedApplication.CreateBuilder(args);

var openAIApiKey = builder.AddParameter("azure-openai-api-key", secret: true);

var openai = builder
    .AddAzureOpenAI("openai")
    .ConfigureInfrastructure(infra =>
    {
        var resources = infra.GetProvisionableResources();
        var account = resources.OfType<CognitiveServicesAccount>().Single();
        account.Properties.DisableLocalAuth = false; // so we can use api key
    });
var gpt4o = openai.AddDeployment("gpt-4o", "gpt-4o", "2024-08-06");
Now we can register this model with the DIAL Core:
var dial = builder.AddDial("dial", port: 8080)
    .WithChatUI(port: 3000)
    .WaitFor(gpt4o); // <-- Wait for the model to be deployed

var dialGpt4o = dial.AddOpenAIModelAdapter("dial-gpt-4o", deploymentName: "gpt-4o")
    .WithUpstream(gpt4o, openAIApiKey)
    .WithDisplayName("gpt-4o")
    .WithDescription(
        "gpt-4o is engineered for speed and efficiency. Its advanced ability to handle complex queries with minimal resources can translate into cost savings and performance."
    )
    .WithWellKnownIcon(WellKnownIcon.GPT4);
Run Everything Together
And that is it! We have added the OpenAI model to our DIAL Core and we are ready to see how everything works together.
The final Program.cs file should look like this:
var builder = DistributedApplication.CreateBuilder(args);

var openAIApiKey = builder.AddParameter("azure-openai-api-key", secret: true);
var openai = builder
    .AddAzureOpenAI("openai")
    .ConfigureInfrastructure(infra =>
    {
        var resources = infra.GetProvisionableResources();
        var account = resources.OfType<CognitiveServicesAccount>().Single();
        account.Properties.DisableLocalAuth = false; // so we can use api key
    });
var gpt4o = openai.AddDeployment("gpt-4o", "gpt-4o", "2024-08-06");

var dial = builder.AddDial("dial", port: 8080).WithChatUI(port: 3000);

var dialGpt4o = dial.AddOpenAIModelAdapter("dial-gpt-4o", deploymentName: "gpt-4o")
    .WithUpstream(gpt4o, openAIApiKey)
    .WithDisplayName("gpt-4o")
    .WithDescription(
        "gpt-4o is engineered for speed and efficiency. Its advanced ability to handle complex queries with minimal resources can translate into cost savings and performance."
    )
    .WithWellKnownIcon(WellKnownIcon.GPT4);

var todoAddonContainer = builder
    .AddDockerfile("todo-addon-container", contextPath: "addons", dockerfilePath: "TodoDockerfile")
    .WithHttpEndpoint(port: null, targetPort: 5003, "http");

var todoAddon = dial.AddAddon("todo-addon")
    .WithUpstream(todoAddonContainer)
    .WithDisplayName("TODO List")
    .WithDescription("Addon that allows to manage user's TODO list.");

dial.AddAssistantsBuilder()
    .AddAssistant("todo-assistant")
    .WithPrompt(
        "You are assistant that helps to manage TODO list for the user. You can add, remove and view your TODOs."
    )
    .WithDescription(
        "The assistant that manages your TODO list. It can add, remove and view your TODOs."
    )
    .WithDisplayName("TODO Assistant")
    .WithAddon(todoAddon);

builder.Build().Run();
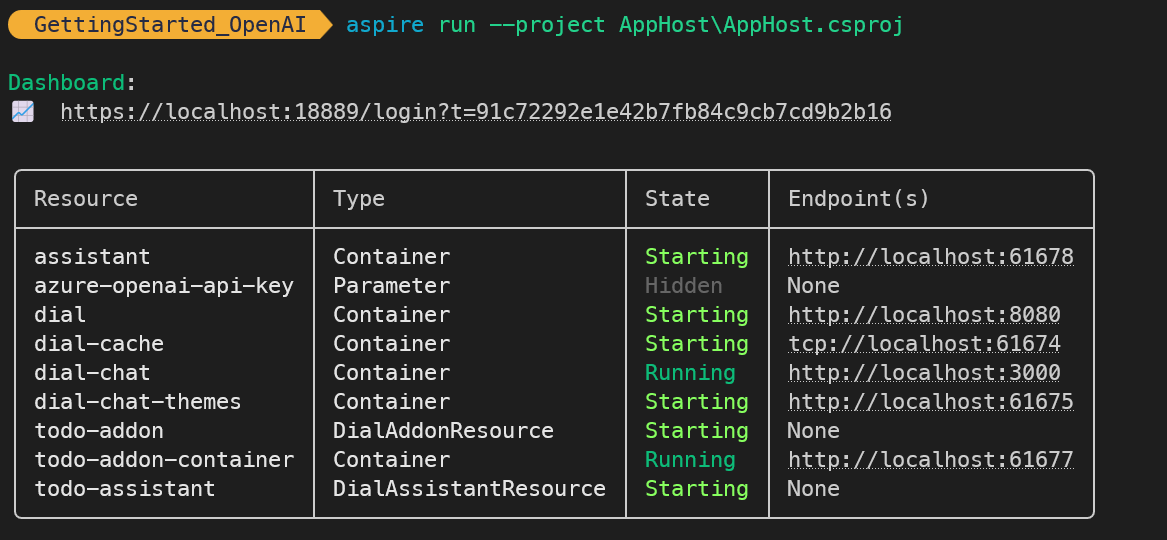
🚀 Let’s run the AppHost again:
aspire run --project AppHost/AppHost.csproj
Here is the output of the Aspire CLI:
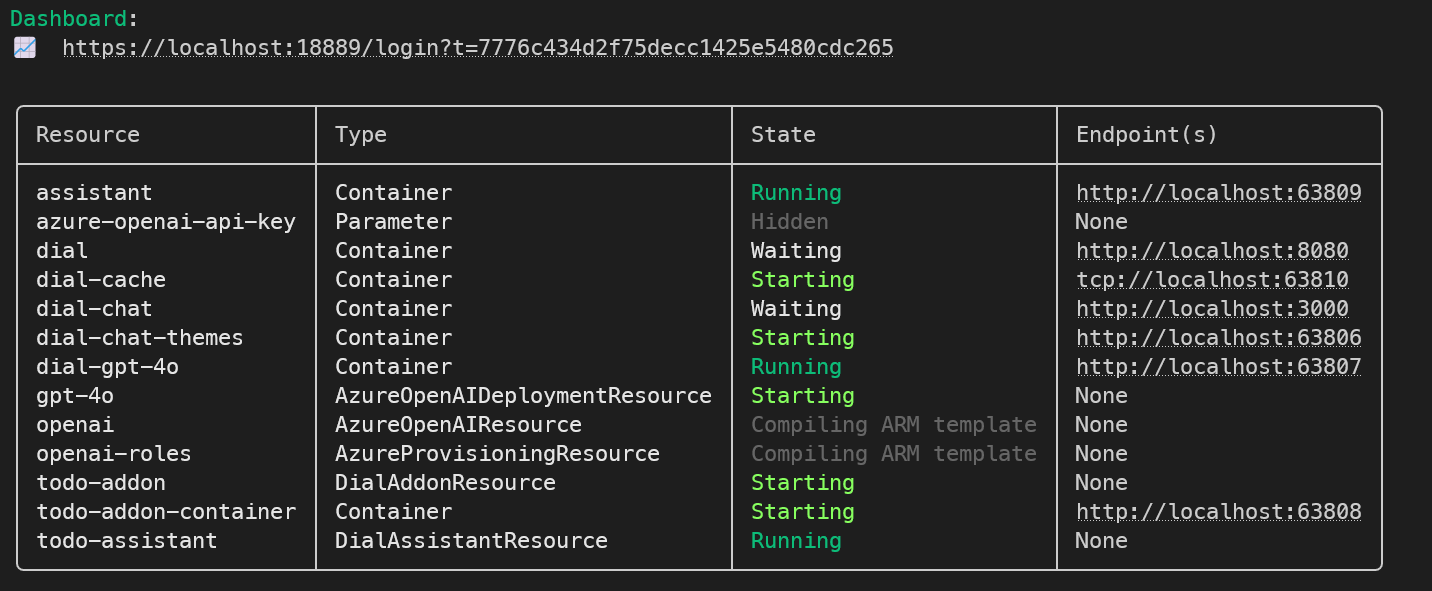
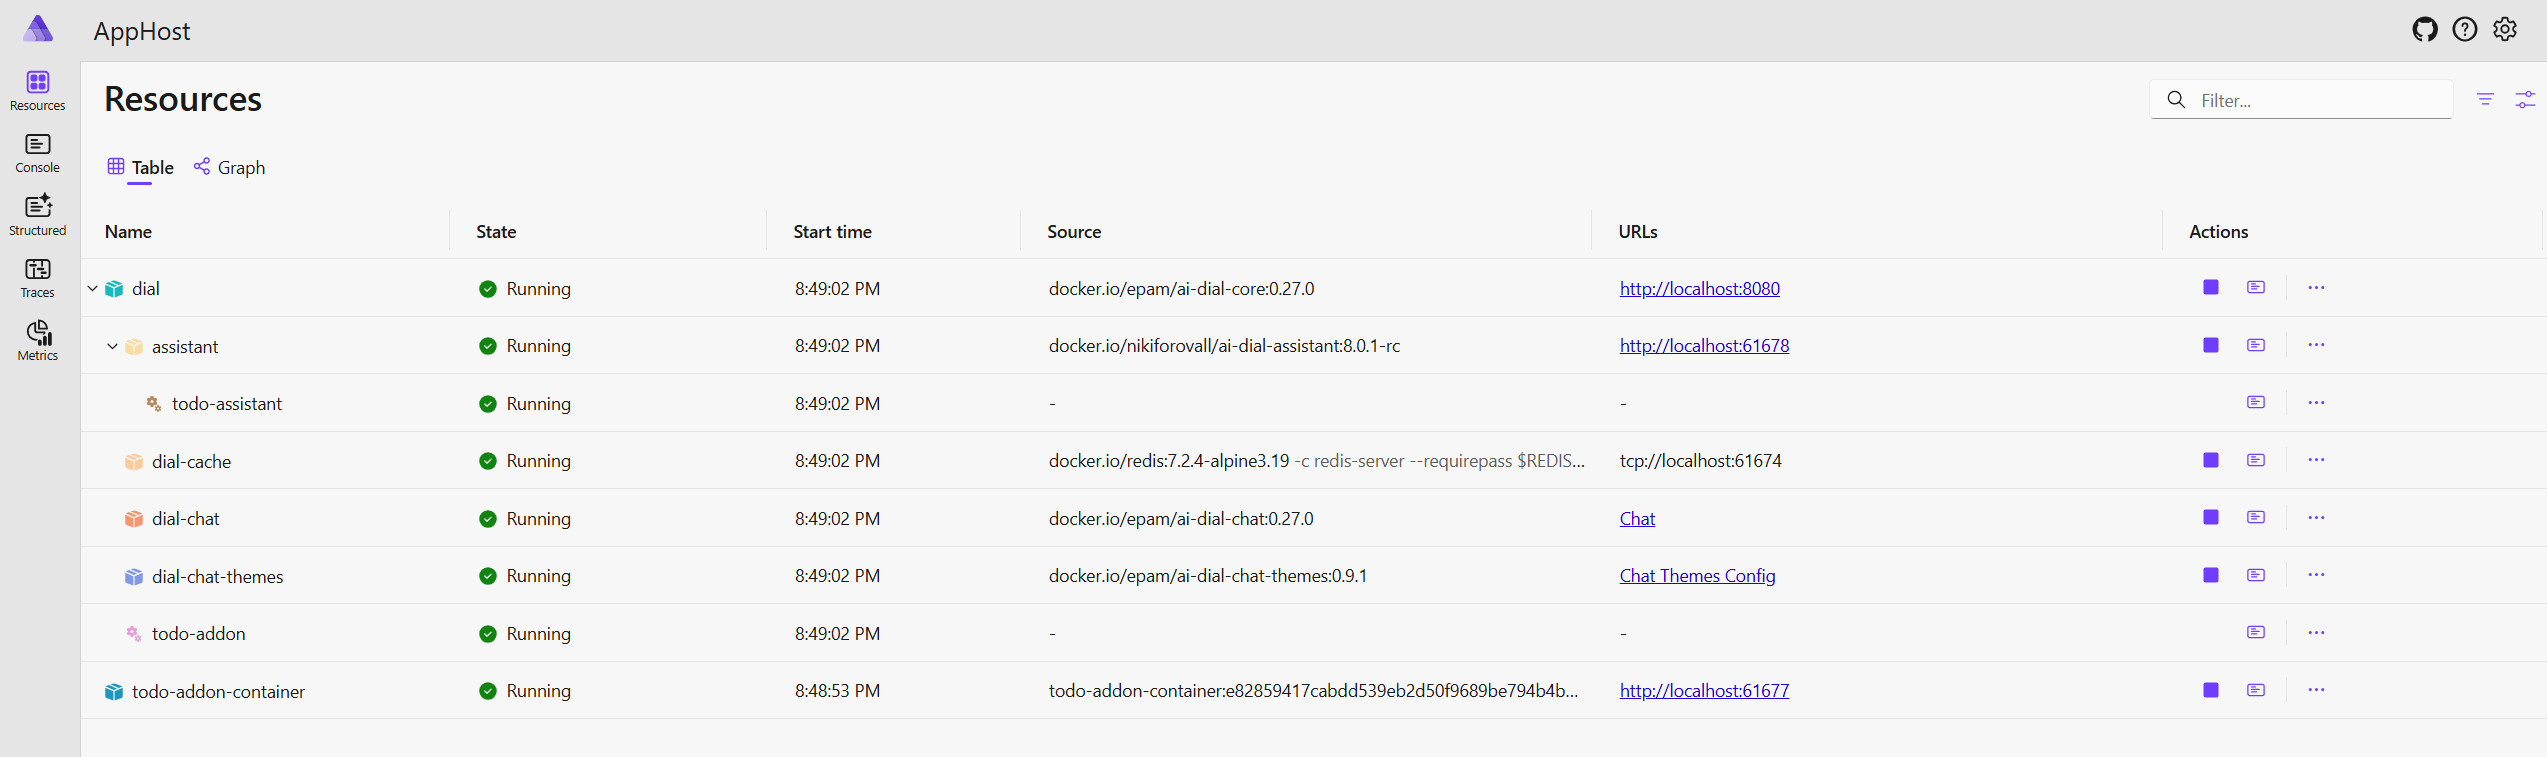
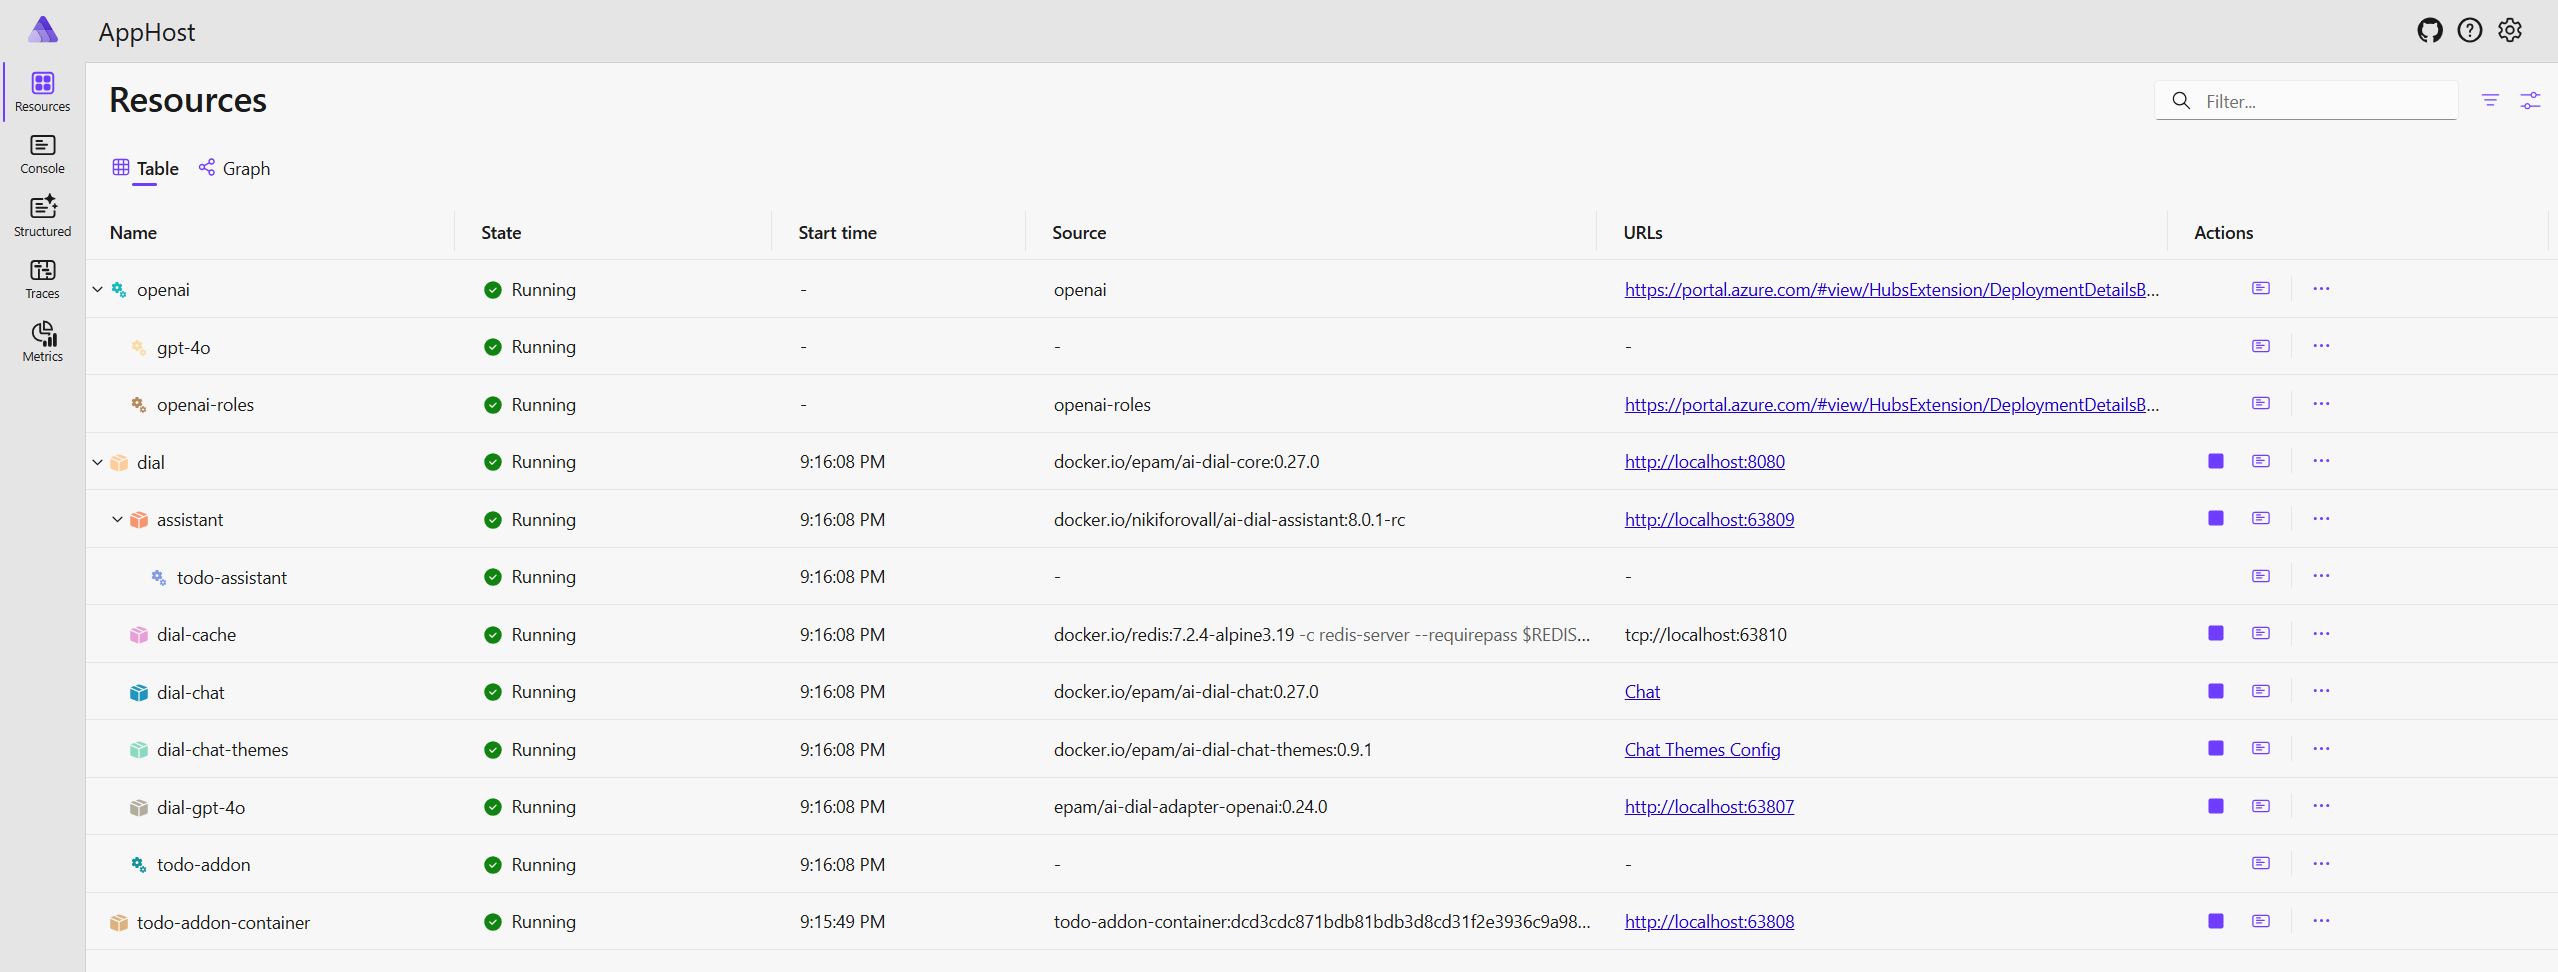
And here is the the Aspire Dashboard:
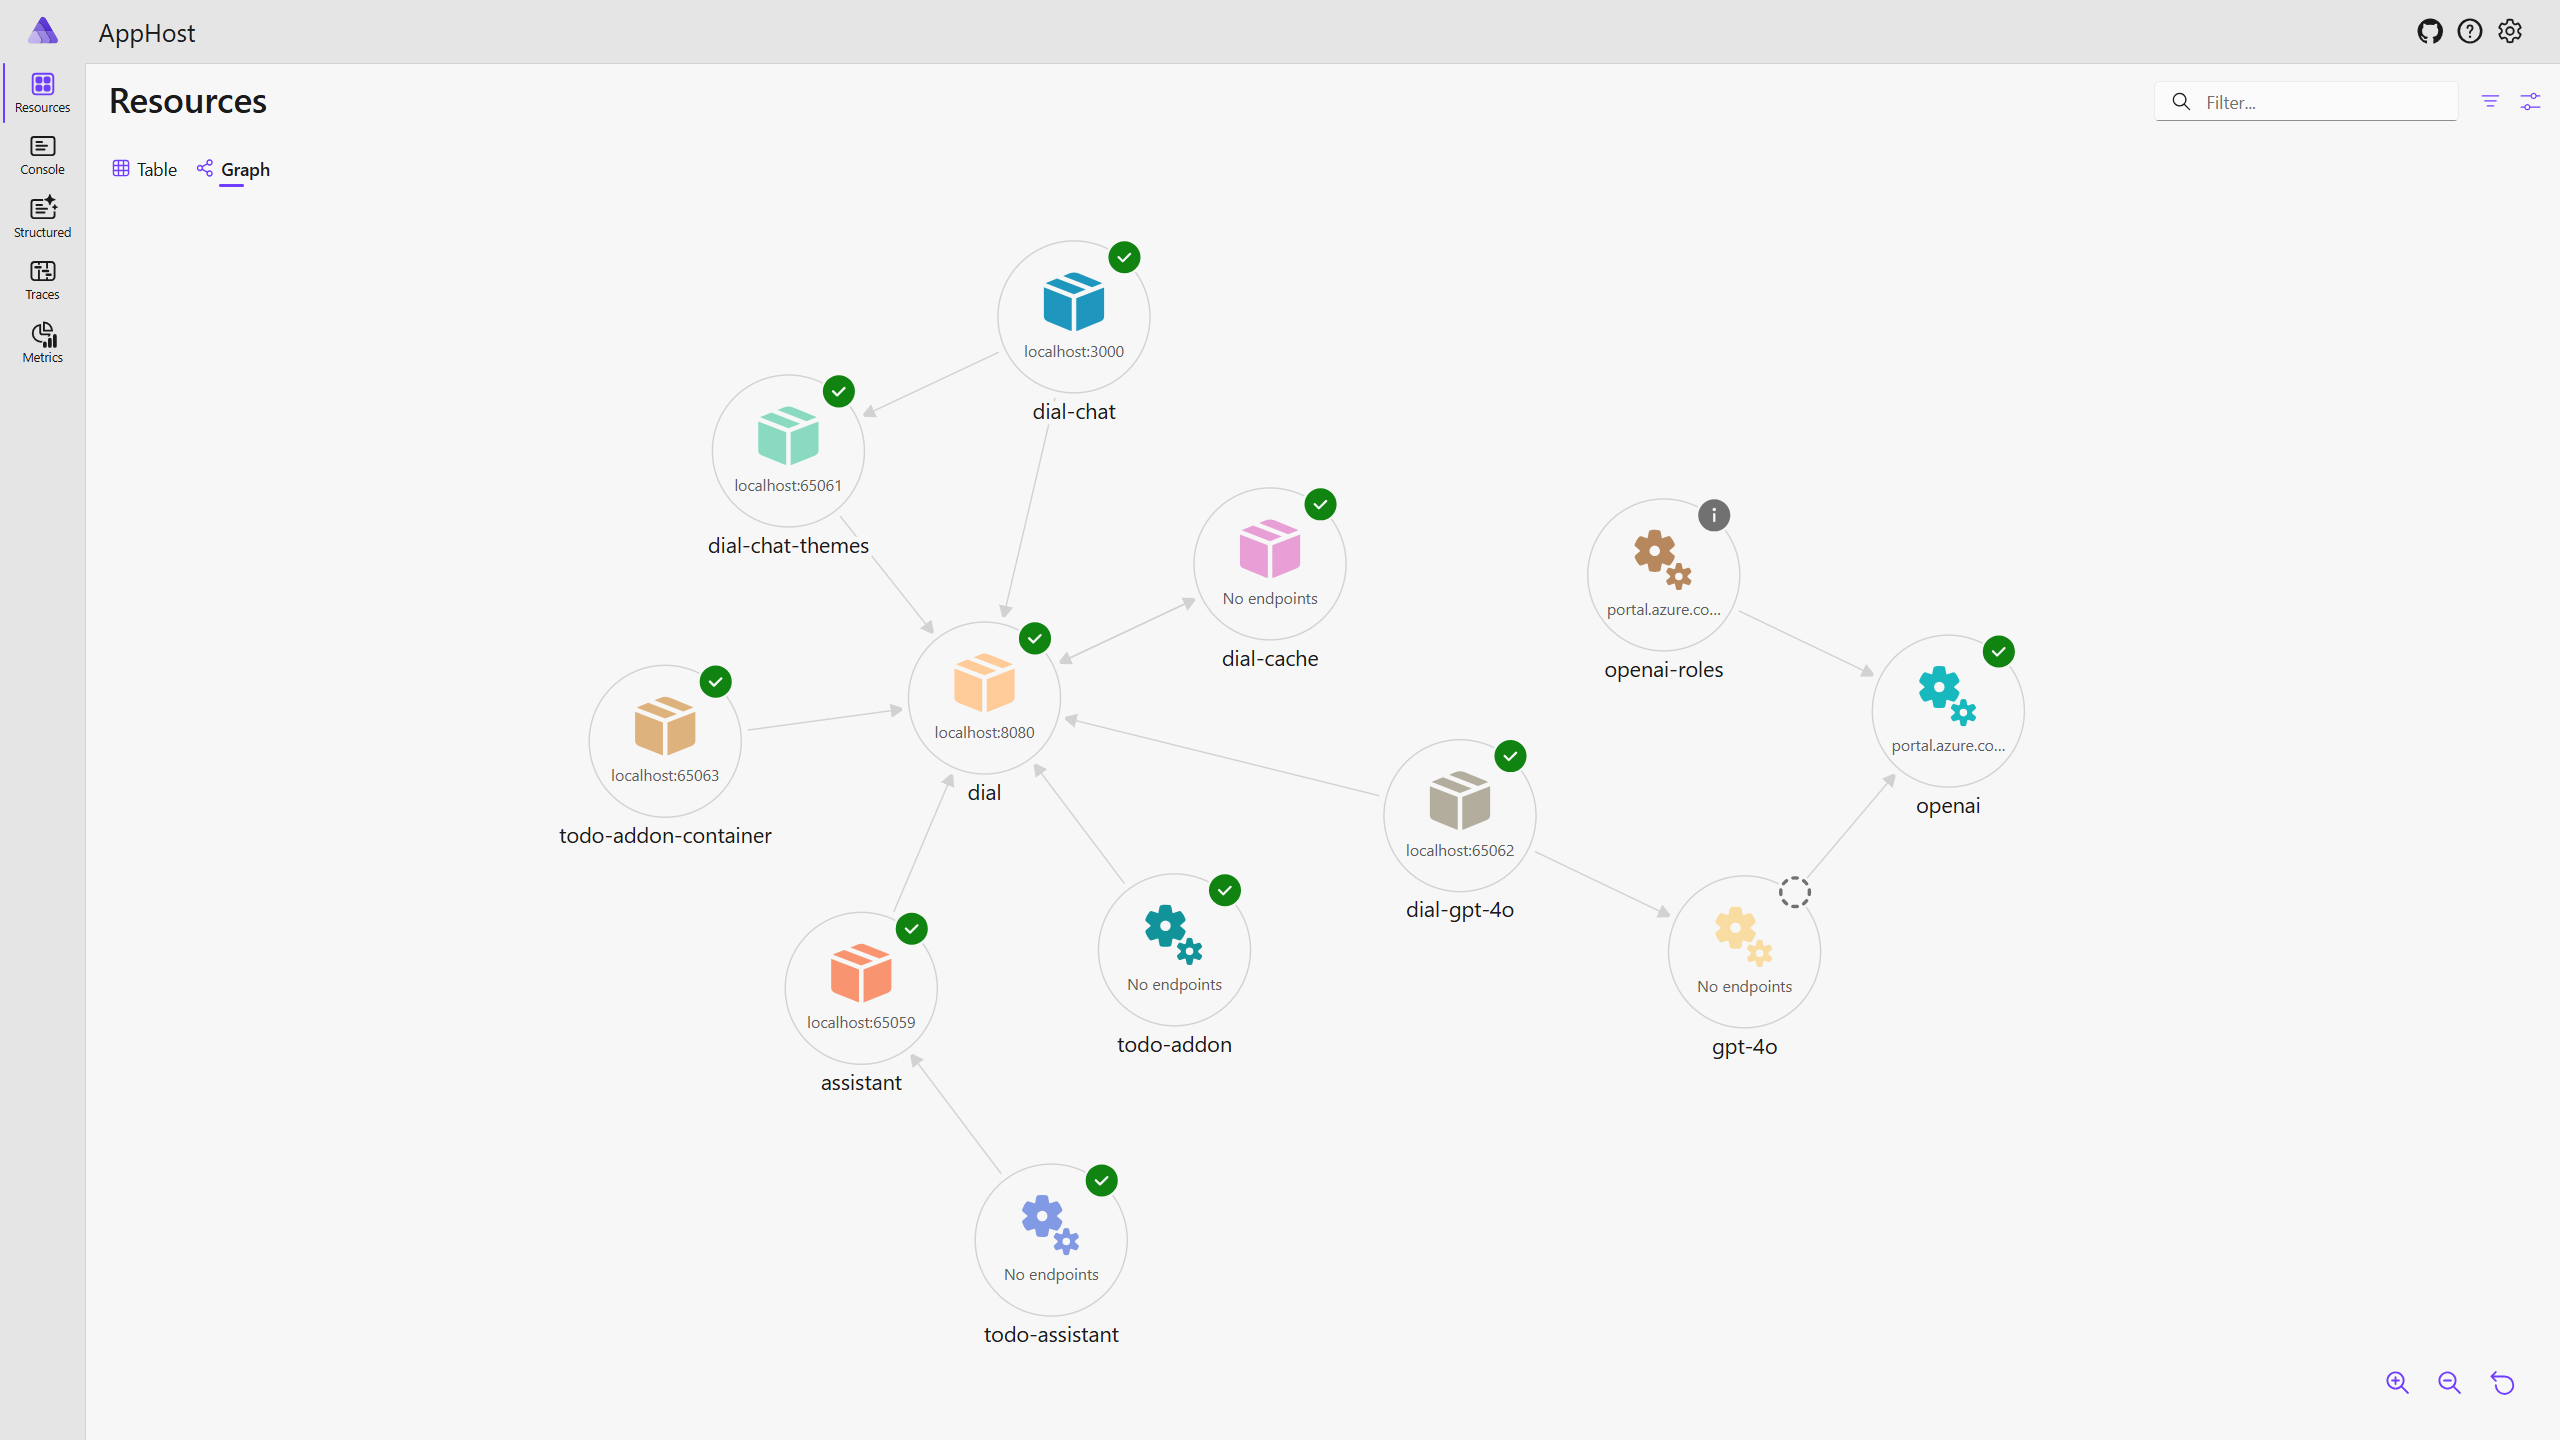
✨ Even more interesting is Aspire Graph Dashboard:
Now, if you open the Chat UI, you will see the TODO Assistant. Let’s try to add some TODOs:

Conclusion
In this blog post, we have learned how to extend AI DIAL with Addons using .NET Aspire. We have built a simple TODO Assistant that allows us to manage our TODO list using natural language commands. We have also learned how to deploy OpenAI model that supports Function Calling and how to integrate it with the DIAL Core.
This is just the beginning of what you can do with AI DIAL and Addons. You can create more complex Addons that integrate with other services or APIs, or you can create your own custom Addons that provide unique functionality.
🙌 I hope you found it helpful. If you have any questions, please feel free to reach out. If you’d like to support my work, a star on GitHub would be greatly appreciated! 🙏
References
