- TL;DR
- Introduction
- Example Overview
- The power of Authorization Server - define policies and permissions
- Summary
- References
TL;DR
Keycloak.AuthService.Authorization provides a toolkit to use Keycloak as Authorization Server. An authorization Server is a powerful abstraction that allows to control authorization concerns. An authorization Server is also advantageous in microservices scenario because it serves as a centralized place for IAM and access control.
Keycloak.AuthServices.Authorization: https://github.com/NikiforovAll/keycloak-authorization-services-dotnet#keycloakauthservicesauthorization
Example source code: https://github.com/NikiforovAll/keycloak-authorization-services-dotnet/tree/main/samples/AuthZGettingStarted
Introduction
Authorization refers to the process that determines what a user is able to do.ASP.NET Core authorization provides a simple, declarative role and a rich policy-based model. Authorization is expressed in requirements, and handlers evaluate a user’s claims against requirements. Imperative checks can be based on simple policies or policies which evaluate both the user identity and properties of the resource that the user is attempting to access.
Resource servers (applications or services serving protected resources) usually rely on some kind of information to decide if access should be granted to a protected resource. For RESTful-based resource servers, that information is usually obtained from a security token, usually sent as a bearer token on every request to the server. For web applications that rely on a session to authenticate users, that information is usually stored in a user’s session and retrieved from there for each request.
Keycloak is based on a set of administrative UIs and a RESTful API, and provides the necessary means to create permissions for your protected resources and scopes, associate those permissions with authorization policies, and enforce authorization decisions in your applications and services.
Considering that today we need to consider heterogeneous environments where users are distributed across different regions, with different local policies, using different devices, and with a high demand for information sharing, Keycloak Authorization Services can help you improve the authorization capabilities of your applications and services by providing:
- Resource protection using fine-grained authorization policies and different access control mechanisms
- Centralized Resource, Permission, and Policy Management
- Centralized Policy Decision Point
- REST security based on a set of REST-based authorization services
- Authorization workflows and User-Managed Access
- The infrastructure to help avoid code replication across projects (and redeploys) and quickly adapt to changes in your security requirements.
Example Overview
In this blog post I will demonstrate how to perform authorization in two ways:
- Role-based access control (RBAC) check executed by Resource Server (API)
/endpoint- required ASP.NET Core identity role/endpoint- required realm role/endpoint- required client role
- Remote authorization policy check executed by Authorization Server (Keycloak)
/endpoint- remotely executed policy selected for “workspace” - resource, “workspaces:read” - scope.
var app = builder.Build();

app
    .UseHttpsRedirection()
    .UseApplicationSwagger(configuration)
    .UseAuthentication()
    .UseAuthorization();

app.MapGet("/endpoint1", (ClaimsPrincipal user) => user)
    .RequireAuthorization(RequireAspNetCoreRole);

app.MapGet("/endpoint2", (ClaimsPrincipal user) => user)
    .RequireAuthorization(RequireRealmRole);

app.MapGet("/endpoint3", (ClaimsPrincipal user) => user)
    .RequireAuthorization(RequireClientRole);

app.MapGet("/endpoint4", (ClaimsPrincipal user) => user)
    .RequireAuthorization(RequireToBeInKeycloakGroupAsReader);

await app.RunAsync();
Project structure:
$ tree -L 2
.
├── AuthZGettingStarted.csproj
├── Program.cs
├── Properties
│   └── launchSettings.json
├── ServiceCollectionExtensions.Auth.cs
├── ServiceCollectionExtensions.Logging.cs
├── ServiceCollectionExtensions.OpenApi.cs
├── appsettings.Development.json
├── appsettings.json
├── assets
│   ├── realm-export.json
│   └── run.http
└── docker-compose.yml
Entry point:
var builder = WebApplication.CreateBuilder(args);
var configuration = builder.Configuration;
var services = builder.Services;

builder.AddSerilog();
services
    .AddApplicationSwagger(configuration)
    .AddAuth(configuration);
Register AuthN and AuthZ services in Dependency Injection container:
public static IServiceCollection AddAuth(
    this IServiceCollection services, IConfiguration configuration)
{
    services.AddKeycloakAuthentication(configuration);

    services.AddAuthorization(options =>
    {
        options.AddPolicy(
            Policies.RequireAspNetCoreRole,
            builder => builder.RequireRole(Roles.AspNetCoreRole));

        options.AddPolicy(
            Policies.RequireRealmRole,
            builder => builder.RequireRealmRoles(Roles.RealmRole));

        options.AddPolicy(
            Policies.RequireClientRole,
            builder => builder.RequireResourceRoles(Roles.ClientRole));

        options.AddPolicy(
            Policies.RequireToBeInKeycloakGroupAsReader,
            builder => builder
                .RequireAuthenticatedUser()
                .RequireProtectedResource("workspace", "workspaces:read"));

    }).AddKeycloakAuthorization(configuration);

    return services;
}

public static class AuthorizationConstants
{
    public static class Roles
    {
        public const string AspNetCoreRole = "realm-role";

        public const string RealmRole = "realm-role";

        public const string ClientRole = "client-role";
    }

    public static class Policies
    {
        public const string RequireAspNetCoreRole = nameof(RequireAspNetCoreRole);

        public const string RequireRealmRole = nameof(RequireRealmRole);

        public const string RequireClientRole = nameof(RequireClientRole);

        public const string RequireToBeInKeycloakGroupAsReader =
            nameof(RequireToBeInKeycloakGroupAsReader);
    }
}
Configure Keycloak
In this post I’m going to skip basic Keycloak installation and configuration, please see my previous posts for more details https://nikiforovall.github.io/tags.html#keycloak-ref.
Prerequisites:
- Create a realm named: Test
- Create a user with username/password: user/user
- Create a realm role: realm-role
- Create a client: test-client
- Create an audience mapper: Audience ➡ test-client
- Enable Client Authentication and Authorization
- Enable Implicit flow and add a valid redirect URL (used by Swagger to retrieve a token)
- Create a client role: client-role
- Create a group called workspace and add the “user” to it
Full Keycloak configuration (including the steps below) can be found at realm-export.json
Authorization based on ASP.NET Core Identity roles
Keycloak.AuthService.Authentication ads the KeycloakRolesClaimsTransformation that maps roles provided by Keycloak. The source for role claim could be one of the following:
- Realm - map realm roles
- ResourceAccess - map client roles
- None - don’t map
Depending on your needs, you can use realm roles, client roles or skip automatic role mapping/transformation. The role claims transformation is based on the config. For example, here is how to use realms role for ASP.NET Core Identity roles. As result, you can use build-in role-based authorization.
{
  "Keycloak": {
    "realm": "Test",
    "auth-server-url": "http://localhost:8080/",
    "ssl-required": "none",
    "resource": "test-client",
    "verify-token-audience": true,
    "credentials": {
      "secret": ""
    },
    "confidential-port": 0,
    "RolesSource": "Realm"
  }
}
So, for a user with the next access token generated by Keycloak the roles are effectively evaluated to “realm-role”, “default-roles-test”, “offline_access”, “uma_authorization”. And if you change “RolesSource” to “ResourceAccess” it would be “client-role”.
{
  "exp": 1672275584,
  "iat": 1672275284,
  "jti": "1ce527e6-b852-48e9-b27b-ed8cc01cf518",
  "iss": "http://localhost:8080/realms/Test",
  "aud": [
    "test-client",
    "account"
  ],
  "sub": "8fd9060e-9e3f-4107-94f6-6c3a242fb91a",
  "typ": "Bearer",
  "azp": "test-client",
  "session_state": "c32e4165-f9bd-4d4c-93bd-3847f4ffc697",
  "acr": "1",
  "realm_access": {
    "roles": [
      "realm-role",
      "default-roles-test",
      "offline_access",
      "uma_authorization"
    ]
  },
  "resource_access": {
    "test-client": {
      "roles": [
        "client-role"
      ]
    },
    "account": {
      "roles": [
        "manage-account",
        "manage-account-links",
        "view-profile"
      ]
    }
  },
  "scope": "openid email profile",
  "sid": "c32e4165-f9bd-4d4c-93bd-3847f4ffc697",
  "email_verified": false,
  "preferred_username": "user",
  "given_name": "",
  "family_name": ""
}
💡 Note, you can change “RolesSource” to “None” and instead of using KeycloakRolesClaimsTransformation, use Keycloak role claim mapper and populate role claim based on configuration. Luckily, it is easy to do from Keycloak admin panel.
services.AddAuthorization(options =>
{
    options.AddPolicy(
        Policies.RequireAspNetCoreRole,
        builder => builder.RequireRole(Roles.AspNetCoreRole))
});
Authorization based on Keycloak realm and client roles
AuthorizationPolicyBuilder allows to register policies and Keycloak.AuthServices.Authorization adds a handy method to register rules that make use of the specific structure of access tokens generated by Keycloak.
services.AddAuthorization(options =>
{
    options.AddPolicy(
        Policies.RequireRealmRole,
        builder => builder.RequireRealmRoles(Roles.RealmRole));

    options.AddPolicy(
        Policies.RequireClientRole,
        builder => builder.RequireResourceRoles(Roles.ClientRole));
});

// PoliciesBuilderExtensions.cs
public static AuthorizationPolicyBuilder RequireResourceRoles(
    this AuthorizationPolicyBuilder builder, params string[] roles) =>
    builder
        .RequireClaim(KeycloakConstants.ResourceAccessClaimType)
        .AddRequirements(new ResourceAccessRequirement(default, roles));

public static AuthorizationPolicyBuilder RequireRealmRoles(
    this AuthorizationPolicyBuilder builder, params string[] roles) =>
    builder
        .RequireClaim(KeycloakConstants.RealmAccessClaimType)
        .AddRequirements(new RealmAccessRequirement(roles));
Authorization based on Authorization Server permissions
Policy Enforcement Point (PEP) is responsible for enforcing access decisions from the Keycloak server where these decisions are taken by evaluating the policies associated with a protected resource. It acts as a filter or interceptor in your application in order to check whether or not a particular request to a protected resource can be fulfilled based on the permissions granted by these decisions.
Keycloak supports fine-grained authorization policies and is able to combine different access control mechanisms such as:
- Attribute-based access control (ABAC)
- Role-based access control (RBAC)
- User-based access control (UBAC)
- Context-based access control (CBAC)
- Rule-based access control
- Using JavaScript
- Time-based access control
- Support for custom access control mechanisms (ACMs) through a Service Provider Interface (SPI)
Here is what happens when authenticated user tries to access a protected resource:
services.AddAuthorization(options =>
{
    options.AddPolicy(
        Policies.RequireToBeInKeycloakGroupAsReader,
        builder => builder
            .RequireAuthenticatedUser()
            .RequireProtectedResource("workspace", "workspaces:read"));
});

// PoliciesBuilderExtensions.cs
/// <summary>
/// Adds protected resource requirement to builder.
/// Makes outgoing HTTP requests to Authorization Server.
/// </summary>
public static AuthorizationPolicyBuilder RequireProtectedResource(
    this AuthorizationPolicyBuilder builder, string resource, string scope) =>
    builder.AddRequirements(new DecisionRequirement(resource, scope));
The power of Authorization Server - define policies and permissions
Resource management is straightforward and generic. After creating a resource server, you can start creating the resources and scopes that you want to protect. Resources and scopes can be managed by navigating to the Resource and Authorization Scopes tabs, respectively.
So, to define a protected resource we need to create it in the Keycloak and assigned scope to it. In our case, we need to create “workspace” resource with “workspaces:read” scope.
For more details, please see https://www.keycloak.org/docs/latest/authorization_services/#_resource_overview.
To create a scope:
- Navigate to “Clients” tab on the sidebar
- Select “test-client” from the list
- Go to “Authorization” tab (make sure you enabled “Authorization” checkbox on the “Settings” tab)
- Select “Scopes” sub-tab
- Click “Create authorization scope”
- Specify workspaces:read as Name
- Click “Save”
To create a resource:
- From the “Authorization” tab
- Select “Resources” sub-tab
- Click “Create resource”
- Specify workspace as Name
- Specify urn:resource:workspace as Type
- Specify “workspaces:read” as “Authorization scopes”
- Click “Save”
Let’s say we want to implement a rule that only users with realm-role role and membership in workspace group can read a “workspace” resource. To accomplish this, we need to create the next two policies:
- From the “Authorization” tab
- Select “Policies” sub-tab
- Click “Create policy”
- Select “Role” option
- Specify Is in realm-role as Name
- Click “Add roles”
- Select realm-role role
- Logic: Positive
- Click “Save”
- Click “Create policy”
- Select “Group” option
- Specify Is in workspace group as Name
- Click “Add group”
- Select “workspace” group
- Logic: Positive
- Click “Save”
Now, we can create the permission:
- From the “Authorization” tab
- Select “Permissions” sub-tab
- Click “Create permission”
- Select “Create resource-based permission”
- Specify Workspace Access as Name
- Specify workspace as resource
- Add workspaces:read as authorization scope
- Add two previously created policies to the “Policies”
- Specify Unanimous as Decision Strategy
- Click “Save”
The decision strategy dictates how the policies associated with a given permission are evaluated and how a final decision is obtained. ‘Affirmative’ means that at least one policy must evaluate to a positive decision in order for the final decision to be also positive. ‘Unanimous’ means that all policies must evaluate to a positive decision in order for the final decision to be also positive. ‘Consensus’ means that the number of positive decisions must be greater than the number of negative decisions. If the number of positive and negative is the same, the final decision will be negative.
Evaluate permissions
- From the “Authorization” tab
- Select “Evaluate” sub-tab
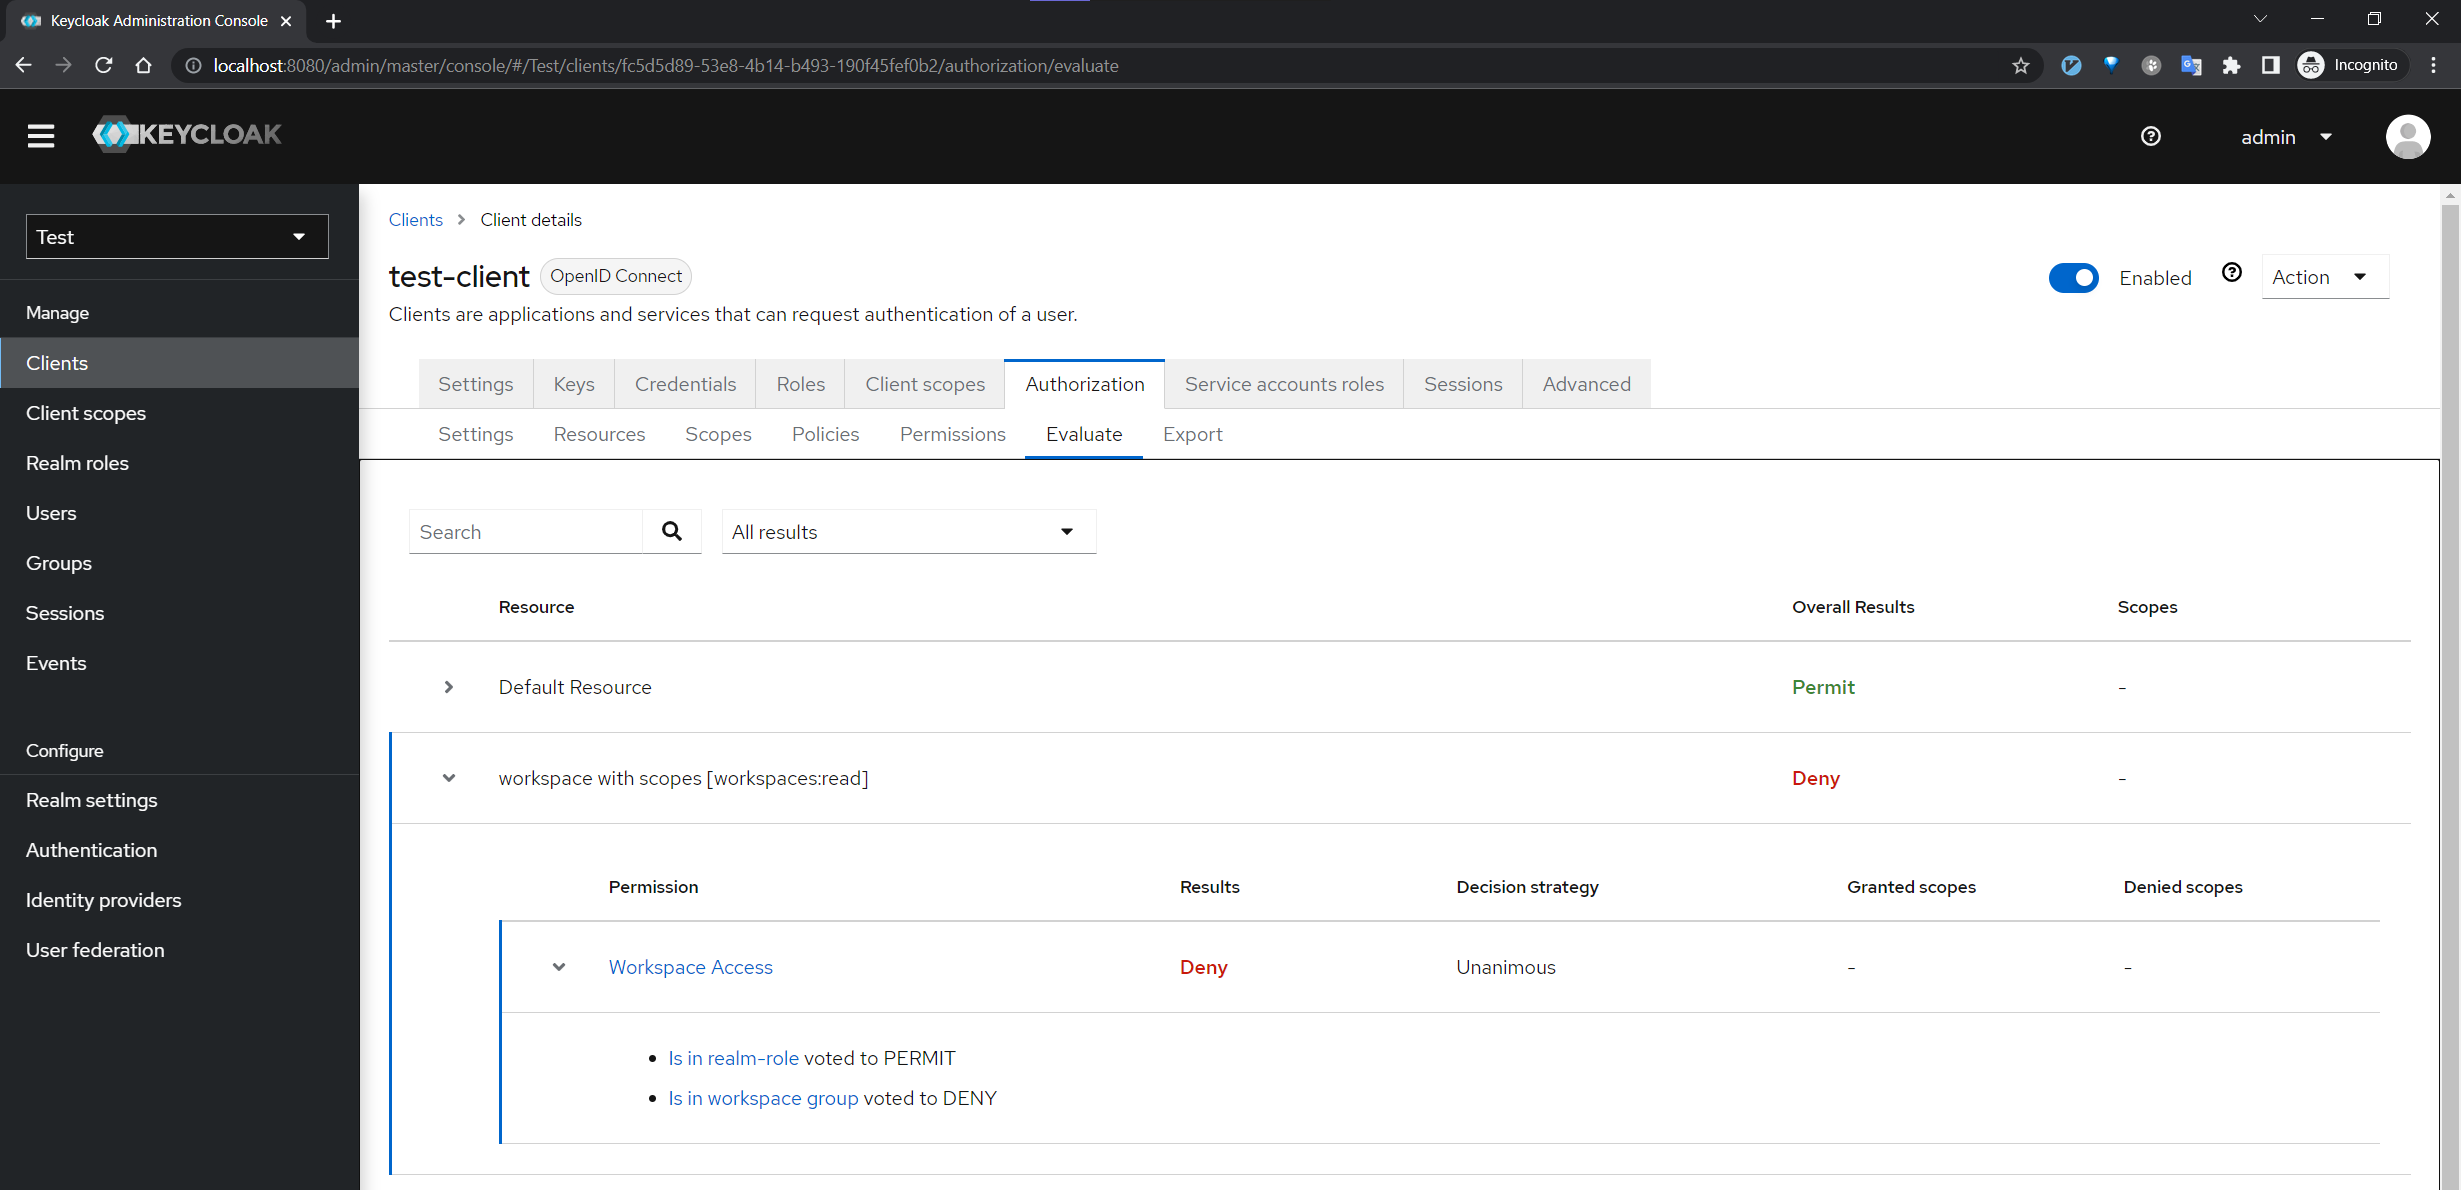
Let’s say the “user” has realm-role, but is not a member of workspace group
Here is how the permission evaluation is interpreted by Keycloak:

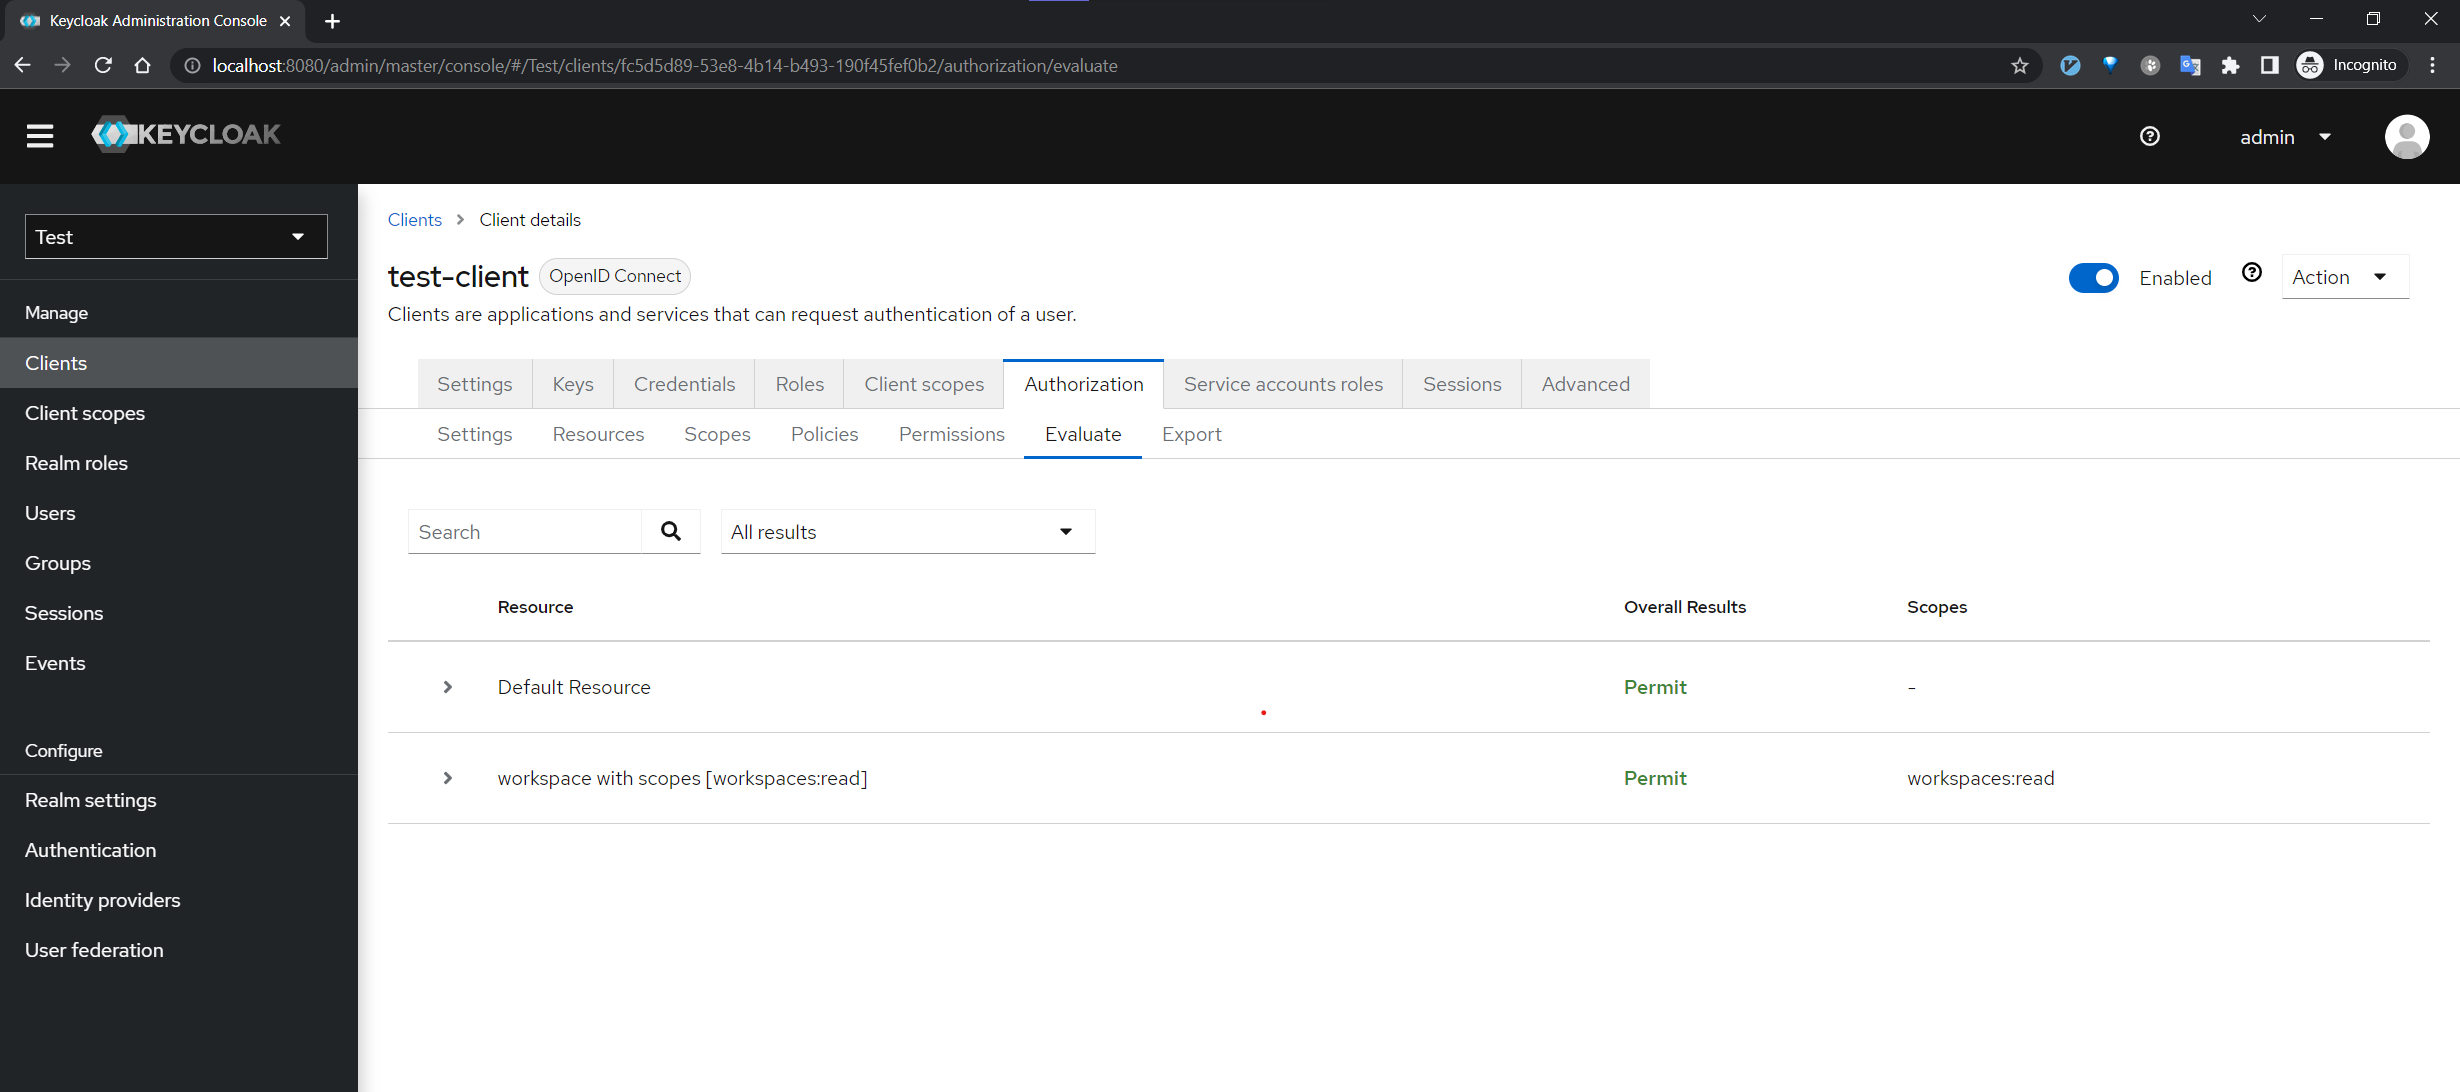
And if we add the “user to workspace group:

Demo
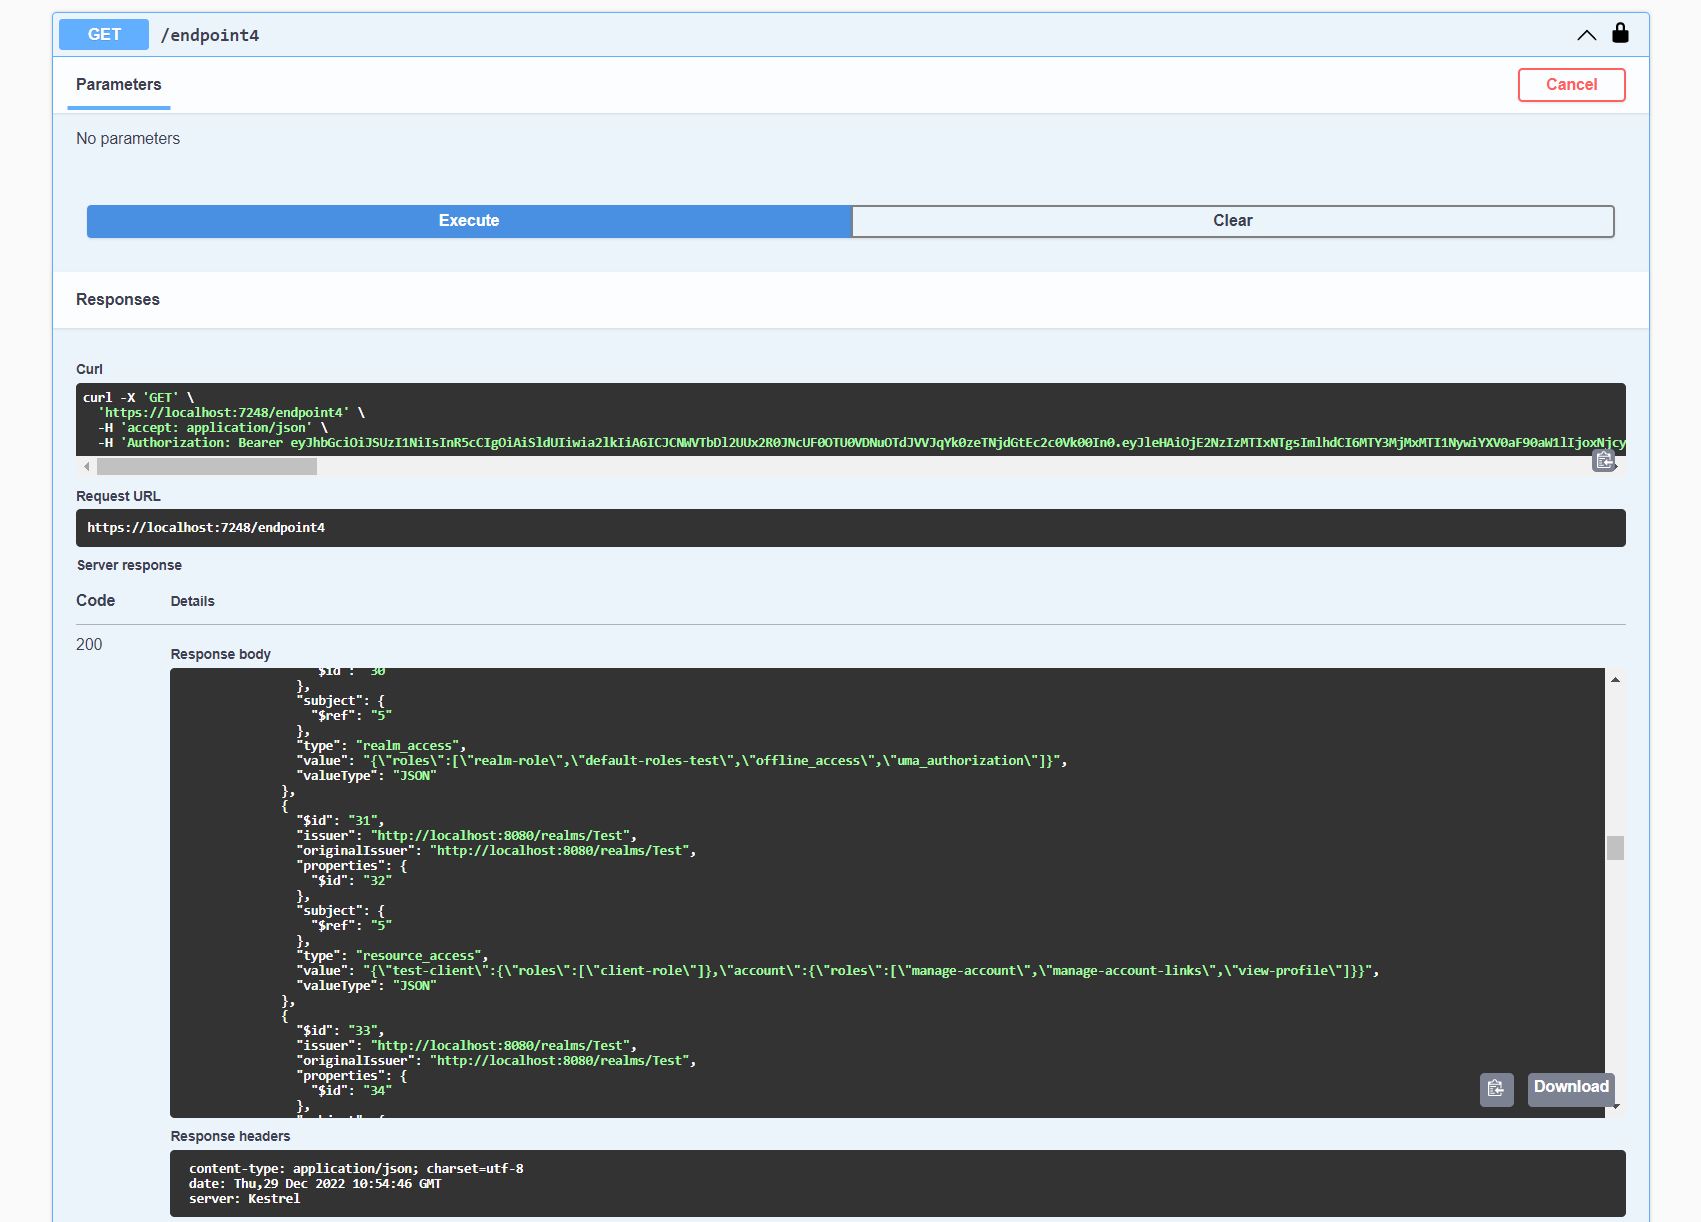
- Navigate at https://localhost:7248/swagger/index.html
- Click “Authorize”. Note, the access token is retrieved based on “Implicit Flow” that we’ve previously configured.
- Enter credentials: “user/user”
- Execute “/endpoint4”

As you can see, the response is 200 OK. I suggest you to try removing “user” from the “workspace” group and see how it works.
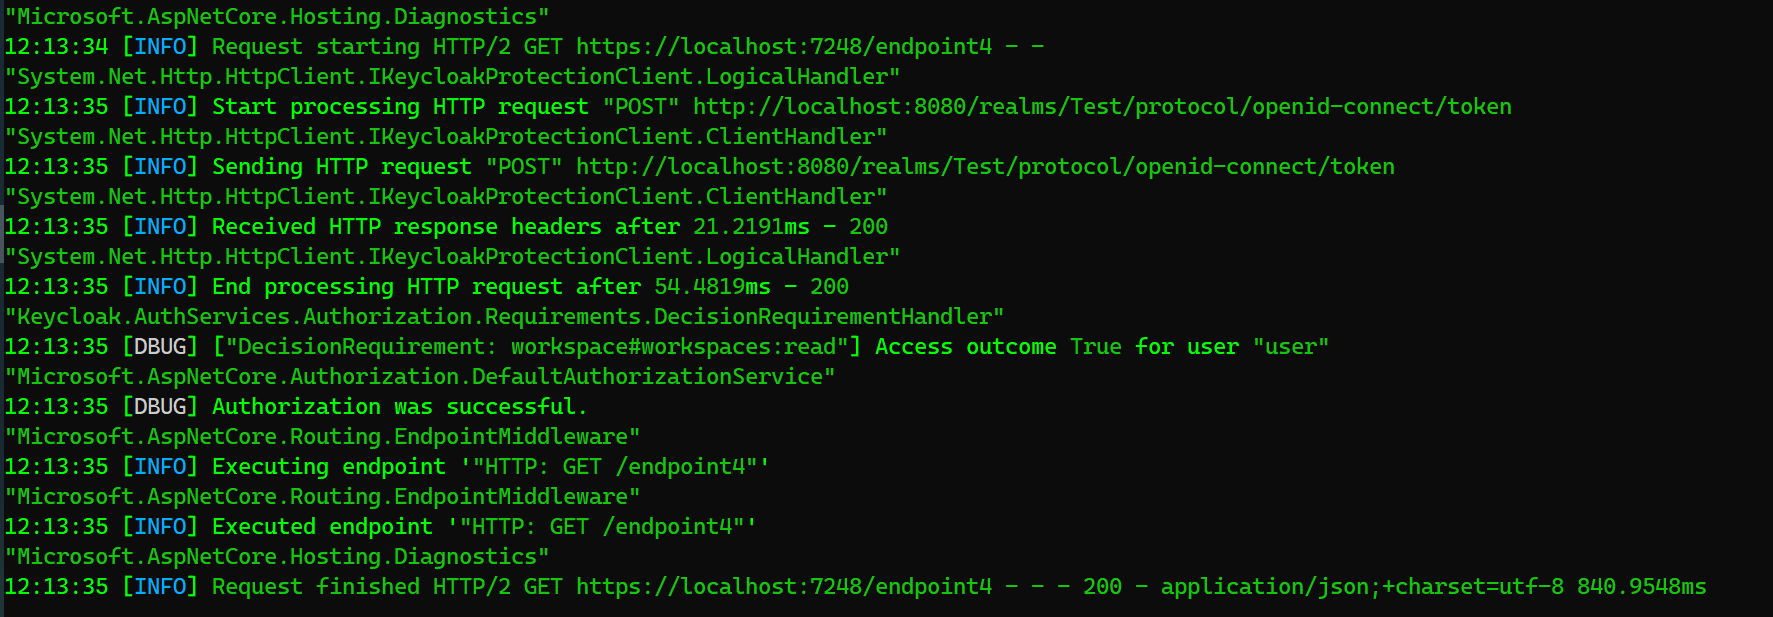
As described above, the permission is evaluated by Keycloak therefore you can see outgoing HTTP requests in the logs:
12:19:28 [INFO] Start processing HTTP request "POST" http://localhost:8080/realms/Test/protocol/openid-connect/token
"System.Net.Http.HttpClient.IKeycloakProtectionClient.ClientHandler"
12:19:28 [INFO] Sending HTTP request "POST" http://localhost:8080/realms/Test/protocol/openid-connect/token
"System.Net.Http.HttpClient.IKeycloakProtectionClient.ClientHandler"
12:19:28 [INFO] Received HTTP response headers after 8.5669ms - 200
"System.Net.Http.HttpClient.IKeycloakProtectionClient.LogicalHandler"
12:19:28 [INFO] End processing HTTP request after 25.3503ms - 200
"Keycloak.AuthServices.Authorization.Requirements.DecisionRequirementHandler"
12:19:28 [DBUG] ["DecisionRequirement: workspace#workspaces:read"] Access outcome True for user "user"
"Microsoft.AspNetCore.Authorization.DefaultAuthorizationService"
12:19:28 [DBUG] Authorization was successful.

💡 Note, In this post, I’ve showed you how to protect a one resource known to the system, but it is actually possible to create resource programmatically and compose ASP.NET Core policies during runtime. See Keycloak.AuthServices.Authorization.ProtectedResourcePolicyProvider for more details.
Summary
An authorization Server is a highly beneficial abstraction and it is quite easy to solve a wide range of well-known problems without “Reinventing the wheel”. Keycloak.AuthServices.Authorization helps you to define a protected resource and does the interaction with Authorization Server for you. Let me know what you think 🙂
References
- https://learn.microsoft.com/en-us/aspnet/core/security/authorization/introduction
- https://learn.microsoft.com/en-us/aspnet/core/security/authorization/roles
- https://learn.microsoft.com/en-us/aspnet/core/security/authorization/policies
- https://www.keycloak.org/docs/latest/authorization_services
- https://www.keycloak.org/docs/latest/authorization_services/#_resource_overview
- https://github.com/NikiforovAll/keycloak-authorization-services-dotnet